
Embroidery design: what it is, how it works, and why it determines the quality of the embroidery.
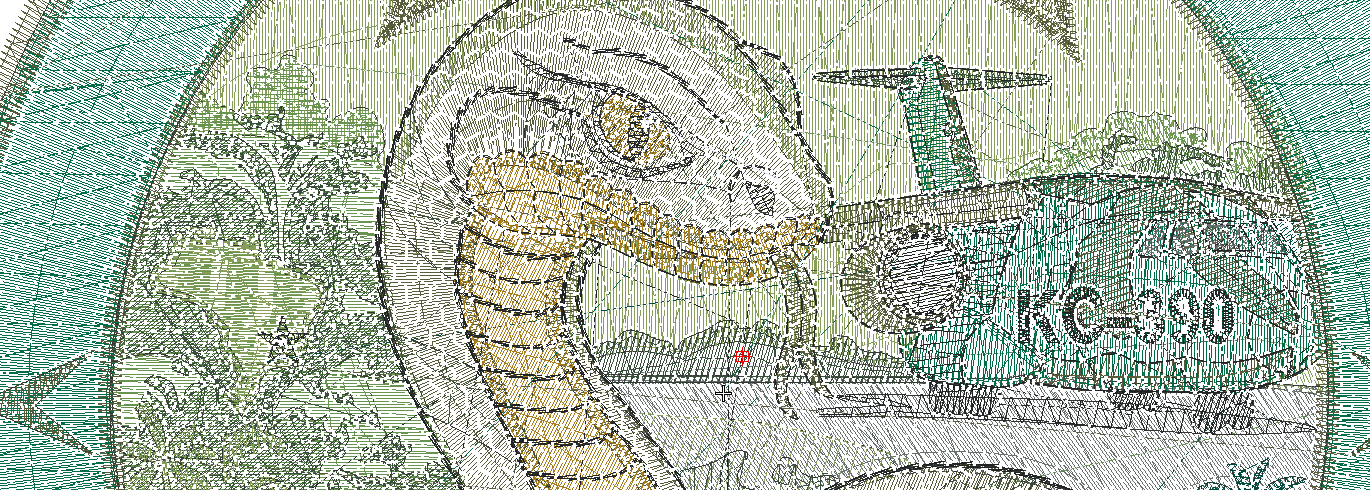
An embroidery digitising file is the digital file that turns a drawing, logo, name or illustration into instructions that an embroidery machine can execute.
It is not simply an image converted into another file format.
The file defines how the hoop must move, where each stitch must be placed, the sequence of the elements, colour changes, thread trims and many other parameters required to reproduce the design with thread.
It is therefore one of the most important parts of any computerised embroidery job.
A good machine cannot compensate for poor digitising. By contrast, a well-prepared embroidery file can produce excellent results on different machines, provided that the equipment, thread tension, hooping, needle, stabiliser and fabric are also set up correctly.
QUICK ANSWER
An embroidery digitising file is created in specialist software and tells the embroidery machine where, how and in what sequence to place the stitches.
The quality of the digitising directly affects the appearance of the embroidery, detail definition, fabric stability, thread breaks, production time and thread consumption.
In this article
- What is computerised embroidery?
- How does an embroidery machine work?
- What information is contained in an embroidery file?
- Do “embroidery file”, “digitising” and “setup” mean the same thing?
- Is an embroidery file the same as a DST file?
- What is the difference between a source file and a machine file?
- Why can an embroidery machine not read PNG or JPEG files directly?
- Is a vector file enough?
- How is an embroidery design digitised?
- Which parameters are set during digitising?
- Can an image be converted into embroidery automatically?
- Can artificial intelligence digitise embroidery designs?
- What makes an embroidery file genuinely good?
- How long does embroidery digitising take?
- How many stitches can an embroidery design contain?
- Does the number of colours make digitising more difficult?
- Can the same embroidery file be used at any size?
- Can the same embroidery file be used on any fabric or product?
- Can poor digitising damage a garment?
- Why do two companies produce different results from the same logo?
- How should you choose an embroidery company?
- How does embroidery digitising work at Bordados Custom?
- Digitising is the foundation of good embroidery
1. What is computerised embroidery?
The commercial embroidery used today on clothing, uniforms, caps, patches, backpacks, towels and many other products is, in most cases, computerised embroidery.
This means that the machine does not decide by itself how to interpret the design.
Before embroidery begins, a digital production file must be created. This file is loaded into the machine, which then executes the programmed stitch sequence.
This is what is generally referred to in English as an embroidery file, a digitised embroidery design or a stitch file.
Common English terms include:
- embroidery design;
- embroidery digitising;
- digitised embroidery file;
- embroidery file;
- stitch file.
In this context, “digitising” does not mean scanning a sheet of paper or simply converting an image into vector artwork.
In embroidery, digitising means interpreting a design and rebuilding it as a functional sequence of embroidery objects and stitches.
2. How does an embroidery machine work?
In simple terms, an embroidery machine can be understood as an automatic sewing machine combined with a system that moves the embroidery hoop.
The needle moves vertically through the fabric. At the same time, the hoop moves horizontally along two axes:
- the X axis, from left to right;
- the Y axis, forwards and backwards.
The combination of these movements positions the fabric correctly for each needle penetration.
Every time the needle goes down through the material and rises again, a stitch is formed. By repeating this process thousands of times, the machine builds lettering, outlines, fills, textures and illustrations.
These movements happen at high speed and with great precision. However, the machine only executes the instructions it receives. It does not judge whether the result is visually attractive, whether lettering is too tight or whether a particular stitch density is suitable for the fabric.
Those decisions are made during the digitising process.
An embroidery machine does not look at a logo in the same way a person does.
It receives a sequence of instructions. If those instructions are poorly prepared, the result will also be poor, regardless of the price or quality of the machine.
3. What information is contained in an embroidery file?
Depending on the format, an embroidery file may store more or less information.
An editable source file may contain data such as:
- object shapes and outlines;
- stitch types;
- stitch angles and directions;
- density;
- pull compensation;
- underlay;
- object sequence;
- entry and exit points;
- colour changes;
- thread trims;
- machine stops;
- the start and end of each object;
- thread colour references;
- design dimensions;
- fabric or product information;
- effects, patterns and textures.
Files intended to be read directly by the machine may contain mainly the stitches and commands required to run the design.
Professional software therefore distinguishes between design files, which preserve editable objects and settings, and machine files, which mainly contain stitches and production commands.
What is underlay?
Underlay stitches are sewn before the main visible stitches.
Their functions can include:
- stabilising the fabric;
- lifting the embroidery away from the surface;
- preventing the top stitches from sinking into the material;
- helping to control distortion;
- improving coverage;
- creating a more even foundation.
The correct underlay depends on the design, the top stitch type, the thread, the material and the intended result.
What are tie-in and tie-off stitches?
Small securing stitches, commonly called tie-in and tie-off stitches, may be added at the beginning and end of certain objects.
They help reduce the risk of the stitching coming undone.
They are not necessarily traditional hand-tied knots. They are short stitch sequences designed to lock the thread in place.
4. Do “embroidery file”, “digitising” and “setup” mean the same thing?
In Portuguese-speaking markets, several expressions are often used for the same service, including “matriz de bordado”, “filme de bordado”, “abertura de filme” and “picagem”. In English, the most natural equivalents are:
- embroidery digitising;
- digitising a design;
- embroidery setup;
- embroidery file creation;
- creating a digitised embroidery design.
The word “matrix” is not normally used in English for this purpose. The correct term depends on whether we are referring to the service, the editable design or the machine-ready file.
At Bordados Custom, we may also refer to a digital proof when speaking to customers, because it is easier to understand.
However, there is an important distinction:
- the embroidery file is the technical file used in production;
- the digital proof is the visual representation used to show the customer an approximate preview of the result.
Embroidery software can create realistic simulations of thread, texture, relief and stitch direction. These previews are useful, but they remain digital estimates. A physical sew-out is still essential.
5. Is an embroidery file the same as a DST file?
No.
An embroidery design can be saved or exported in different formats. DST is only one of those formats.
DST is widely used because it is recognised by a large range of embroidery machines and software. It is therefore considered a broadly compatible machine format within the industry.
However, a DST file does not preserve all the information contained in the original design file.
It usually stores mainly:
- stitch positions;
- the movements required to form the design;
- jump commands;
- trims or stops, depending on the equipment;
- colour-change or needle-change commands.
Although a DST file can indicate that a colour change is required, it does not necessarily store the actual thread colour. When a DST file is opened in software, the colours displayed may be assigned automatically and may not match the thread colours used in the original production.
Wilcom explains that a DST file does not contain enough information to reconstruct the original colours and that, although software may attempt to recover objects from the stitches, it cannot fully restore the original editable design file.
Are an embroidery file and a DST file the same thing?
No. “Embroidery file” is a general term. DST is a machine format that contains mainly stitch data and production commands.
6. What is the difference between a source file and a machine file?
This distinction is essential for understanding why some files are easy to edit while others are not.
| File type | Main content | Ease of editing | Use |
|---|---|---|---|
| Source design file | Objects, shapes, parameters, colours, densities and effects | High | Creating and editing the embroidery design |
| Machine file | Stitches and production commands | Limited | Running the design on the machine |
| PNG or JPEG image | Pixels and visual information | Contains no embroidery logic | Visual reference |
| Vector file | Shapes, lines, curves and colours | Useful as a starting point | Preparing the artwork |
A professional source file allows the digitiser to select an object and change, for example:
- its size;
- density;
- stitch angle;
- stitch type;
- underlay;
- pattern;
- pull compensation;
- production sequence.
In a DST file, the software mainly finds a sequence of stitches. It may try to recognise and group certain areas, but it cannot always reconstruct the original decisions.
For this reason, editing a DST can be much more difficult than editing the original source file.
Common embroidery file formats
Many formats exist for different software packages, machine brands and equipment.
EMB
EMB is a native Wilcom format. It can store objects, shapes, colours, stitches, densities, underlay, compensation and other editable information. It can then be exported to machine formats such as DST.
DST
DST is a stitch-based format widely used on industrial embroidery machines and also recognised by many domestic machines. It offers broad compatibility but preserves less editable information than a source design file.
PES
PES is used by Brother machines and software. Brother confirms that PES files can be saved through PE-DESIGN and read by compatible machines. Different versions of the format exist to maintain compatibility with different generations of equipment.
JEF
JEF is the default stitch format for many Janome and Elna machines. According to Janome, it contains the coordinates used to move the hoop and an instruction for each stitch in the design.
Other formats
Other formats include:
- EXP;
- VP3;
- VIP;
- HUS;
- XXX;
- PCS;
- SEW;
- SHV.
Exact compatibility always depends on the machine brand, model and software version.
7. Why can an embroidery machine not read PNG or JPEG files directly?
A PNG or JPEG file contains visual information arranged as pixels.
An embroidery machine needs more than the knowledge that a blue area or a black line exists. It needs sewing instructions.
For example:
- where the first stitch starts;
- which direction it should travel;
- the length of each stitch;
- which area should be embroidered first;
- when the machine should stop;
- when the colour should change;
- where the thread should be trimmed;
- which underlay should be used;
- how fabric movement should be compensated for.
An image does not contain these decisions.
It would not be technically correct to say that PNG or JPEG files “have no coordinates”, because pixels are also organised by position. The issue is that these positions do not represent hoop movements or sewing instructions.
The image must be interpreted and converted into embroidery objects.
8. Is a vector file enough?
A vector file is usually an excellent starting point for embroidery digitising.
It can make the work easier because it may already contain:
- defined shapes;
- curves;
- outlines;
- separate colours;
- correct proportions;
- scalable elements.
However, a vector file is not an embroidery file.
It does not automatically define:
- stitch type;
- density;
- underlay;
- pull compensation;
- sequence;
- thread trims;
- entry and exit points;
- stitch direction;
- adaptation to the fabric.
Vector artwork helps rebuild the geometry of the design. Embroidery digitising turns that geometry into something that can actually be stitched.
Supplying good vector artwork may reduce preparation time, but it does not remove the need for digitising.
An AI, EPS, SVG, PDF or CDR file can be an excellent graphic starting point, but it still does not contain the instructions required by an embroidery machine.
Do you have a logo that you would like to turn into embroidery?
We analyse the artwork, recommend a suitable size and adapt the details to achieve a clean, legible result.
9. How is an embroidery design digitised?
The process begins long before the first stitches are generated.
The digitiser must analyse:
- the original artwork;
- the final size;
- line thickness;
- the level of detail;
- the number of colours;
- the fabric;
- the product;
- the embroidery position;
- the thread type;
- the machine that will be used;
- the intended visual result.
After this analysis, the design is rebuilt in specialist embroidery software.
Step 1 — Analyse and adapt the artwork
Not every detail in an image works well when reproduced with thread.
It may be necessary to:
- thicken lines;
- open up narrow spaces;
- simplify elements;
- increase the size of lettering;
- remove details that would not be visible;
- adjust proportions;
- separate objects;
- alter contrasts.
The goal is not to change the identity of the design unnecessarily. It is to ensure that the design remains recognisable after being translated into thread.
Step 2 — Create the objects
Rather than drawing every stitch manually, the digitiser creates shapes and paths.
For example, to embroider a square, it is not necessary to draw every fill line individually. A square object is created and the appropriate embroidery parameters are applied.
The software generates the stitches from those settings.
Step 3 — Select stitch types
Common stitch types include:
- running stitch;
- satin stitch;
- fill stitch;
- tatami fill;
- programmed stitches;
- special patterns and textures.
Each stitch type has different applications.
Narrow lettering may use satin stitch. A large area may require a fill stitch. A very fine detail may be created with running stitch.
Step 4 — Organise the stitch sequence
The order of the objects affects:
- stability;
- alignment;
- overlaps;
- the number of colour changes;
- the number of trims;
- production speed;
- the final appearance.
A poorly organised sequence can cause gaps between elements that should fit together.
Step 5 — Generate and review the stitches
Once the objects and parameters have been defined, the software calculates the stitches.
The digitiser checks for:
- areas that are too dense;
- stitches that are too long or too short;
- overlaps;
- jumps;
- trims;
- small gaps;
- distortion;
- colour changes;
- sequence efficiency.
Step 6 — Produce a physical sew-out
A digital preview is useful, but it does not replace a real embroidery test.
At Bordados Custom, we carry out sew-outs before production, particularly for new or complex designs and for designs applied to different materials.
The sew-out can reveal problems that may not be obvious on screen.
Step 7 — Correct and approve the design
After the sew-out, the following may be adjusted:
- densities;
- pull compensation;
- underlay;
- sequences;
- overlaps;
- stitch directions;
- outlines;
- dimensions;
- details.
Some designs are correct on the first attempt. Others require several versions before the intended result is achieved.
10. Which parameters are set during digitising?
Quality depends on much more than drawing the outlines correctly.
The main parameters include:
Density
Density defines the spacing between rows of stitches.
Excessive density can:
- make the embroidery stiff;
- distort the fabric;
- increase thread breaks;
- cause needle breakage;
- increase thread consumption;
- create heavy stitch build-up.
Insufficient density can allow the background to show through and leave areas with poor coverage.
Stitch direction
Stitch direction has a major effect on the appearance of the embroidery.
It can be used to:
- reflect light differently;
- visually separate objects of the same colour;
- create depth;
- follow the shape of an object;
- improve stability.
Pull compensation
Thread tension pulls on the fabric and can make certain areas narrower than intended.
Pull compensation adds a calculated margin to counteract this effect.
Entry and exit points
The point at which each object begins and ends affects the sequence, jumps, trims and overall stability.
Underlay
Underlay is the supporting stitch structure beneath the visible embroidery.
The correct choice depends on the fabric and the main stitch type.
Overlap
Where two elements meet, one may need to extend beneath the other. This helps prevent gaps caused by fabric movement.
Trims and jumps
An efficient embroidery file avoids unnecessary movement and reduces the number of loose thread ends that require finishing.
Textures and patterns
Specialist software can be used to create:
- regular patterns;
- custom textures;
- light-reflection effects;
- raised effects;
- transitions;
- combinations of stitch types.
11. Can an image be converted into embroidery automatically?
Yes. Automatic and semi-automatic conversion tools are available.
Professional software can analyse bitmap or vector images and generate embroidery objects. Wilcom, for example, provides tools for automatically converting graphics and photographs, and other manufacturers also include auto-digitising functions in their software.
However, the existence of an automatic function does not mean that the result is immediately ready for production.
Automatic conversion may struggle to interpret:
- very small elements;
- overlapping objects;
- shadows;
- gradients;
- textures;
- fine outlines;
- photographs;
- low-contrast areas;
- production sequences;
- the specific requirements of the fabric.
For simple designs, automation can speed up part of the process. For complex designs, it may create so many problems that correcting the automatic result takes longer than digitising the design from scratch.
In our experience, automatic conversion is useful as an auxiliary tool, but it does not replace analysis, sew-outs and the judgement of an experienced digitiser.
12. Can artificial intelligence digitise embroidery designs?
Systems that use artificial intelligence in parts of the process already exist.
For example, some tools analyse an image, reduce the number of colours, identify objects and select stitch types or directions. Wilcom documentation refers to the use of AI in auto-digitising processes, while also recognising that not every image is suitable and that results may not meet expectations.
It would therefore no longer be accurate to say that artificial intelligence cannot create any form of embroidery file.
The more important question is:
Can it consistently create a complex, attractive, efficient, production-ready embroidery design without professional intervention?
In our experience, not yet.
Artificial intelligence and automation can assist with specific tasks, but many decisions still depend on:
- practical experience;
- fabric behaviour;
- knowledge of the machine;
- aesthetic judgement;
- personal taste;
- analysis of the sew-out;
- commercial objectives;
- the physical limitations of thread.
The future is likely to become increasingly automated, but not necessarily fully automatic.
The most realistic scenario is a semi-automatic process in which software performs part of the work and a professional reviews, adapts, tests and approves the result.
13. What makes an embroidery file genuinely good?
The simplest answer is:
A good embroidery file runs well and produces an attractive result.
The customer does not need to understand every technical setting.
The customer needs to receive embroidery that:
- resembles the original artwork;
- has legible lettering;
- has clean outlines;
- does not distort the garment;
- does not contain unwanted gaps;
- is not excessively stiff;
- preserves the important details;
- has a clean finish;
- remains consistent across multiple units.
From a production perspective, a good embroidery file should also:
- avoid unnecessary thread breaks;
- reduce trims;
- limit jumps;
- avoid heavy stitch build-up;
- use an efficient sequence;
- control thread consumption;
- reduce machine time;
- protect needles and machine components;
- make repeat production easier.
Quality and efficiency should not be treated as opposing goals.
A design should be as efficient as possible, but never at the expense of the final result.
Knowing every tool in a software package does not guarantee that someone will produce good embroidery.
As in other visual disciplines, a sense of proportion, balance, texture, contrast and detail is required.
Embroidery digitising combines technical knowledge with artistic interpretation.
14. How long does embroidery digitising take?
It depends mainly on complexity.
A very simple design may take only a few minutes. A complex design may require several hours or even several days when creation, sew-outs and revisions are included.
At Bordados Custom, an embroidery design takes an average of around three hours to prepare. However, that average includes very different types of work.
We have produced:
- simple names prepared in a few minutes;
- logos that required several hours;
- complex designs involving more than 15 or 20 hours of work;
- illustrations that required multiple sew-outs and corrections.
Size is not always the most important factor.
A small design with many details, fine lettering and overlapping elements can require much more work than a large design made from simple shapes.
Do you need professionally digitised embroidery without a separate setup fee?
At Bordados Custom, the technical preparation is included in the quotation for the finished product.
15. How many stitches can an embroidery design contain?
There is no fixed number.
The stitch count depends on:
- size;
- density;
- the filled area;
- stitch type;
- detail;
- the amount of lettering;
- overlaps;
- underlay;
- effects.
Based on our production experience, approximate figures can include:
| Type of work | Indicative stitch count |
|---|---|
| Small name | Fewer than 1,000 |
| Larger name | 1,500 to 2,000 |
| Simple logo | 8,000 to 15,000 |
| Detailed patch of approximately 10 cm | 20,000 to 45,000 |
| Large or highly complex embroidery | 100,000 to 200,000 or more |
These figures are only examples from our production. They are not universal rules.
Two designs of the same size can have completely different stitch counts.
Stitch count should not be confused with quality. A design with more stitches is not automatically better. In some cases, an excessive stitch count is precisely a sign of poor digitising.
16. Does the number of colours make digitising more difficult?
Not always.
A design can contain many colours but consist of large, simple shapes. Another design may use only one colour but contain tiny lettering, complex outlines and numerous details.
Complexity depends more on factors such as:
- the number of objects;
- the level of detail;
- very small elements;
- overlaps;
- effects;
- alignment requirements;
- the product type;
- the difficulty of interpreting the artwork.
The number of colours affects production because it may increase thread or needle changes, but it does not by itself determine the time required to digitise the design.
17. Can the same embroidery file be used at any size?
Not always.
When the original editable file is available, the dimensions can be changed and the stitches recalculated. Even then, adjustments may still be required.
When a design is enlarged, it may be possible to preserve or add more detail.
When it is reduced, it may be necessary to:
- remove elements;
- thicken lines;
- increase spacing;
- simplify lettering;
- change stitch types;
- reorganise outlines.
Reducing a complex design can require a substantial part of the embroidery file to be rebuilt.
Why should a DST file not simply be enlarged?
Enlarging a stitch file directly can simply spread the existing stitches further apart.
This can cause:
- loss of density;
- stitches that are too long;
- areas with poor coverage;
- distortion;
- incorrect underlay.
When reducing the design, the opposite can happen: the stitches become too close together and create excessive density.
Significant size changes should be made in the original source file whenever possible.
18. Can the same embroidery file be used on any fabric or product?
Not necessarily.
The same design may need to be adjusted for embroidery on:
- a T-shirt;
- a polo shirt;
- a sweatshirt;
- a jacket;
- a cap;
- a patch;
- a towel;
- a backpack;
- stretch fabric;
- thick material;
- high-pile fabric.
A design prepared for a patch with a stable base may not work in the same way on a lightweight T-shirt.
Likewise, a cap has a structure, curvature and production sequence that differ from those of a flat garment.
Adjustments may involve:
- density;
- underlay;
- pull compensation;
- stitch direction;
- sequence;
- stitch type;
- machine speed;
- the minimum size of details.
In some cases, minor adjustments are enough. In others, a separate version of the embroidery file should be created for that product.
19. Can poor digitising damage a garment?
Yes.
An excessively dense or poorly sequenced design can contribute to:
- puckering;
- holes;
- stiffness;
- distortion;
- thread breaks;
- needle breakage;
- stitch build-up;
- misalignment;
- fabric damage.
However, not every problem should be attributed to digitising.
The result also depends on:
- stabiliser;
- hooping;
- thread tension;
- the needle;
- the thread;
- machine speed;
- garment preparation;
- machine maintenance;
- the operator’s experience.
Digitising is central to the process, but it does not operate in isolation.
20. Why do two companies produce different results from the same logo?
Because there is no single way to interpret a design.
Two digitisers may make different decisions regarding:
- simplification;
- stitch direction;
- sequence;
- density;
- underlay;
- stitch types;
- overlaps;
- textures;
- outlines;
- details.
Production methods may also differ in terms of:
- thread;
- fabric;
- stabiliser;
- machine;
- tension;
- needles;
- finishing.
For this reason, the machine brand alone is not enough to predict quality.
The company’s experience matters, but the result depends mainly on the people who digitise the designs, operate the machines and control production.
A company may have existed for several decades and still produce outdated work. A professional with fewer years in business may produce excellent results if they have knowledge, high standards and a commitment to improvement.
Experience should be judged through demonstrated work, not only by the number of years a company has existed.
21. How should you choose an embroidery company?
The best approach is to examine the company’s portfolio.
However, looking only at isolated photographs of finished embroidery is not enough.
Ideally, look for examples showing:
- the original artwork or logo;
- the adaptation carried out;
- the finished embroidery.
This comparison allows you to assess:
- fidelity to the original;
- the ability to interpret artwork;
- lettering quality;
- retention of detail;
- clean outlines;
- visual balance;
- finishing quality.
It is also important to understand whether the company:
- carries out sew-outs;
- adapts the file to the product;
- advises the customer;
- offers solutions for difficult artwork;
- controls production internally;
- keeps files for future orders.
A portfolio should include both simple and complex work. Embroidering one large word does not demonstrate the same technical ability as interpreting a detailed illustration, coat of arms or logo with very small elements.
An embroidery design may look attractive when viewed on its own and still differ greatly from the artwork that was requested.
Comparing the original artwork with the finished product is one of the best ways to assess quality.
22. How does embroidery digitising work at Bordados Custom?
At Bordados Custom, we control the entire process internally, from embroidery digitising to the finished embroidered product.
We have a specialist dedicated to embroidery digitising and use the experience gained from real production to improve each design.
We do not create embroidery files merely to look attractive on screen. We create them to run correctly on the products and materials we use.
We do not charge a separate digitising or setup fee
Many companies charge separately for:
- embroidery setup;
- digitising;
- creating the embroidery file;
- initial programming.
At Bordados Custom, we do not charge a separate digitising or setup fee.
The customer receives a quotation for the finished product without having to add an unexpected fee simply for us to begin preparing the design.
The time required to prepare the design is naturally part of our pricing structure, particularly for small orders, but we do not present the customer with a separate charge of several dozen euros for digitising the artwork.
The production file remains stored with us
Under our working policy, the embroidery file created by Bordados Custom is an internal production tool and remains stored in our systems.
The customer’s logo, name or identity continues to belong to its respective owner. We do not use the private logo of a company, association or group to produce work for other customers.
In the case of public symbols, such as certain coats of arms or institutional identities, similar requests may be received from different organisations or individuals. Even so, each production is handled according to the order received.
The technical file we create is not automatically supplied because it is part of our internal process and has been prepared specifically for our materials, threads, equipment and production methods.
This policy is not intended to lock the customer in
The customer remains free to use another company and request a new digitised embroidery file elsewhere.
Our decision is intended to ensure that our technical work is not used outside the context for which it was developed.
A well-digitised design does not, by itself, guarantee good embroidery. If it is used with:
- unsuitable thread;
- incorrect tension;
- the wrong stabiliser;
- uncontrolled size changes;
- different materials;
- poorly set-up machines;
the result may differ greatly from the embroidery we produce.
We prefer to take responsibility for the complete process rather than provide a file whose final use and result we can no longer control.
We keep the design for future orders
If a customer places another order after one, three or five years, we try to retrieve the previous embroidery file and production information.
This helps maintain:
- dimensions;
- proportions;
- sequence;
- the level of detail;
- thread colour references;
- consistency between orders.
If an old file is no longer available or we believe it can be improved, we prepare it again without creating the problem of a new separate setup fee for the customer.
Small changes do not require a new setup charge
Changes such as:
- changing a colour;
- correcting a letter;
- changing a name;
- adjusting a small element;
- modifying the colour sequence;
do not automatically result in another digitising fee.
Some colour changes can be made directly during machine preparation. Others require a minor change to the file.
When the artwork changes completely, it is naturally treated as a new design. Even then, we maintain our policy of quoting the finished product without an unexpected separate digitising fee.
We normally redigitise files created elsewhere
We frequently receive customers who say that they already have an embroidery file.
However, we do not always know:
- which fabric it was created for;
- which size it was prepared for;
- which thread type was considered;
- which changes were made;
- whether it was physically tested;
- whether the file is genuinely editable;
- whether the result meets our quality standard.
We have received files with serious problems involving density, sequence and finishing.
For this reason, when necessary, we rebuild the design from the original artwork. This decision is not intended to increase the price, but to ensure that we can take responsibility for the final quality.
From artwork to finished embroidery, we control the entire process
Send us your logo, name or illustration and receive a solution adapted to the chosen product and size.
23. Frequently asked questions about embroidery digitising
What is an embroidery digitising file?
It is a digital file that turns artwork into stitch instructions, hoop movements, sequences, colour changes and machine functions that an embroidery machine can execute.
Do embroidery digitising and embroidery setup mean the same thing?
They are often used to describe the technical preparation of an embroidery design, although “digitising” is the more precise English term for creating the stitch-based design.
Is an embroidery file simply an image?
No. An image shows the visual appearance of a design. An embroidery file contains sewing instructions.
Can a PNG file be sent directly to an embroidery machine?
Generally, no. A PNG can be used as a visual reference, but it must be interpreted and prepared in embroidery software.
Is a vector file already ready for embroidery?
No. Vector artwork helps with the shapes, but it does not contain density, underlay, stitch types, sequence or other embroidery parameters.
What is a DST file?
It is a stitch-based format widely recognised by embroidery machines and software. It mainly stores movement and production commands, but does not preserve all the information in the original editable file.
Does a DST file store the correct colours?
It can indicate colour changes, but it usually does not reliably store the actual thread colour references used in production.
Can a DST file be edited?
It can be edited at stitch level or reinterpreted by certain software, but it does not offer the same flexibility as the original object-based source file.
How large is an embroidery file?
Machine files are usually relatively small because they mainly contain coordinates and commands. File size varies according to the format, stitch count and additional information stored.
How long does embroidery digitising take?
It can take from a few minutes to several hours or days. At Bordados Custom, the average is approximately three hours, although complex designs can easily exceed 15 or 20 hours.
How many stitches does a name usually contain?
A small name may contain fewer than one thousand stitches. Larger names may reach approximately 1,500 or 2,000 stitches, depending on the font, size and thickness.
How many stitches does a logo contain?
A simple logo may contain between 8,000 and 15,000 stitches. More detailed or heavily filled designs may contain tens or hundreds of thousands of stitches.
Do more stitches mean better quality?
No. Excessive stitching can cause stiffness, distortion, thread breaks and unnecessary thread consumption.
Does the number of colours determine the difficulty?
Not necessarily. Detail, the size of the elements and construction complexity are usually more important.
Can an embroidery design be enlarged?
Yes, particularly when the editable source file is available, but adjustments may be required. Enlarging a stitch file directly can reduce density and create stitches that are too long.
Can an embroidery design be reduced?
Yes, but reducing a design can be more difficult than enlarging it. Details may need to be removed, spacing increased and elements rebuilt.
Can the same file be used for a T-shirt and a cap?
Not always. The products have different structures and behaviour. A cap may require a specific construction and stitch sequence.
Does the same embroidery file work on different machines?
A compatible format can be read by different machines, but the result also depends on machine settings, tension, thread, stabiliser, needle and product preparation.
Can an embroidery file become obsolete?
Not necessarily. However, it can be improved or adapted because of new materials, threads, equipment, sizes or the digitiser’s technical development.
Can poor digitising damage clothing?
Yes. Excessive density, stitch build-up and unsuitable sequences can contribute to holes, distortion or stiffness.
Can artificial intelligence already digitise embroidery designs?
Automatic tools and AI-assisted systems already exist. However, complex work still normally requires professional review, adaptation, sew-outs and correction.
Why do some companies charge for digitising?
Because creating the file can require many hours of specialist work. Each company defines its own commercial policy and terms relating to file delivery.
Does Bordados Custom charge a separate digitising or setup fee?
No. We do not charge a separate digitising or setup fee. The customer receives a quotation for the finished product.
Is the embroidery file created by Bordados Custom supplied to the customer?
It is not supplied automatically. It remains stored as an internal production tool, allowing us to control the process and maintain the quality of the result.
If I order again later, will I have to pay another digitising fee?
We do not charge another separate digitising fee. We try to retrieve the previous work or prepare it again when necessary.
If I only change one colour, is a new embroidery file required?
Usually not. The change can be made in the file or, in some cases, during machine preparation.
Can I provide an embroidery file created by another company?
You can send it for assessment, but we may choose to redigitise the design to ensure that it meets our quality standards and is suitable for the selected product.
How can I recognise poorly prepared embroidery?
Common signs include illegible lettering, puckered fabric, misaligned outlines, unwanted gaps, excessive density, stiffness, loose thread ends and obvious differences from the original artwork.
Digitising is the foundation of good embroidery
Computerised embroidery combines technology, knowledge of materials, production experience and artistic interpretation.
The machine is an essential tool, but it does not create quality by itself.
Before every embroidered product, there is invisible work involving analysis, construction, testing and refinement. That work is concentrated in the digitised embroidery design.
It is the embroidery file that transforms a static image into a sequence of thousands of coordinated movements.
Therefore, when comparing embroidery companies, do not look only at the machine brand or the number of machines available. Examine the work, compare the original artwork with the finished results and choose a company that controls the entire process.
At Bordados Custom, we digitise the designs internally, carry out sew-outs and produce the embroidery ourselves. This allows us to follow each project from the customer’s original file through to the finished product.
Turn your artwork into production-ready embroidery
We digitise the design, carry out the sew-outs and produce the finished work with no minimum order and no separate digitising fee.
